How to create a new AWS Account?
Starting your cloud journey? Let’s create your first or a new AWS Account
Fernando Honig
Last Update 3 ปีที่แล้ว
In addition to reading this guide, we recommend you to check this article regarding AWS Best Practices around how to design your workload so that you can understand its state
Overview
When starting using AWS or when building new projects or workloads, creating a new AWS account is recommended.
Create your AWS Account from scratch
Open the Amazon Web Services home page. Choose Create an AWS Account.
Note: If you signed in to AWS recently, choose Sign in to the Console. If Create a new AWS account isn't visible, first choose Sign in to a different account, and then choose Create a new AWS account.
Enter your account information, and then choose Continue. Be sure that you enter your account information correctly, especially your email address.
If you enter your email address incorrectly, you can't access your account. Choose Personal or Professional. Note: Personal accounts and professional accounts have the same features and functions.
Enter your company or personal information.
Important: For professional AWS accounts, it's a best practice to enter the company phone number rather than a personal cell phone.
Configuring a root account with an individual email address or a personal phone number can make your account insecure.
Read and accept the AWS Customer Agreement.
Note: Be sure that you read and understand the terms of the AWS Customer Agreement.
Choose Create Account and Continue.
After this initial configuration, you will need to go over some payment method and phone number verification.
Once that’s done, AWS will ask you for an AWS Support Plan, select the most appropriate for your usage. If you’re unsure about the plans, compare here the options
Note: Account activation can sometimes be delayed.
Create your AWS Account using AWS Organizations
If you recently enabled AWS Organizations, (if you haven’t yet, we recommend you to read this guide), creating a new AWS Account is much simpler.
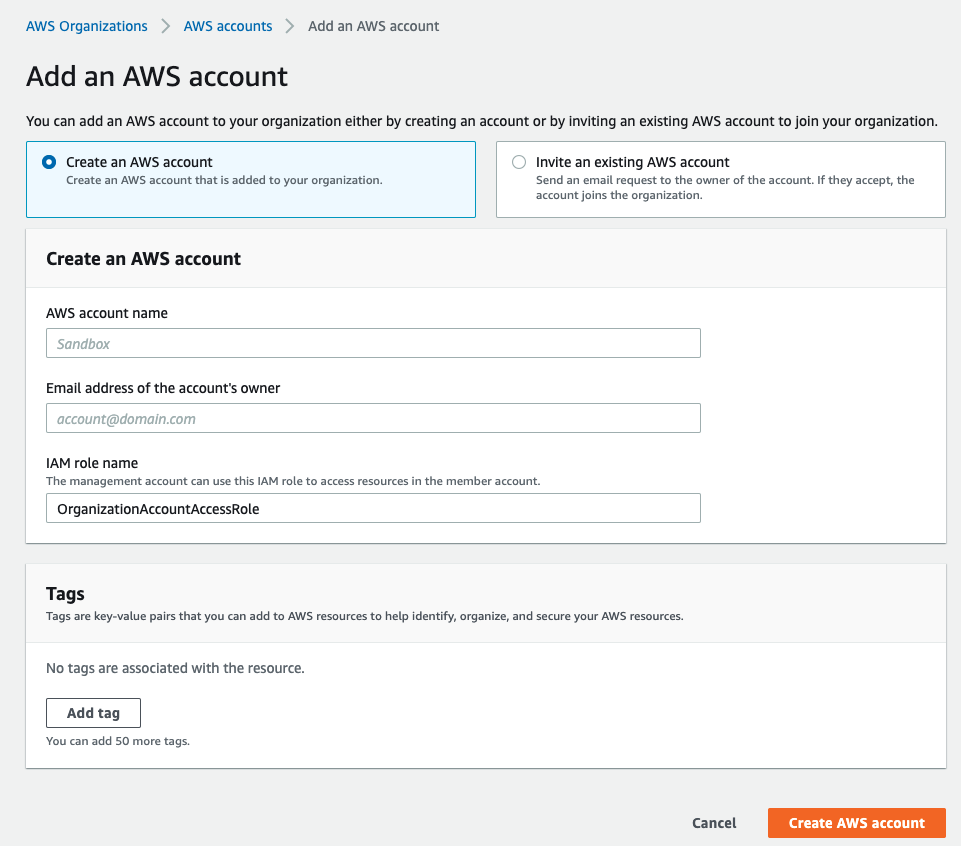
Go to AWS Organizations within your primary account, and click on the “Add an AWS Account” button at the top right of your screen.
Indicate the Account Name (we suggest identifying the account with the type of workload you will in it, e.g: product1-testing)
Indicate the Email address associated with this account. This will be your root user.
You can leave the IAM Role Name as it is, unless you need to define a particular role name to assume into the new AWS Account.
We suggest you always add Tags to resources you create, and an AWS Account is a resource. In this case, indicate who is the responsible of this account, if it has a timeline associated, any information that could help you identify the purpose of this account.

If you’re creating a new AWS Account in order to onboard it to StackZone, make sure you read the pre-requisites to invite an AWS Account into StackZone.
Want to know more about StackZone and how to make your cloud management simple and secure?
Check our how it works section with easy to follow videos or just create your own StackZone Account here


