Set up CloudWatch on an ECS cluster

Luna Ricci
Last Update vor 3 Jahren
To get logs and metrics to CloudWatch from an ECS cluster using an Auto Scaling Group as a capacity provider, we’ll need to:
1. Install the CloudWatch Agent on the cluster’s instances on instance creation
2. Restart all instances (ideally, one by one and not reducing capacity)
3. Add permissions to the EC2 instance role to publish log events
4. Create a log group for each Service
5. Update each Task Definition to send logs to the newly created log group
6. Recreate all Tasks using the new Task Definition Revision
Note: If you are using the EC2 launch type for your tasks, your Amazon ECS container instances require at least version 1.9.0 of the container agent
Note: If you are using Fargate as a capacity provider for your ECS cluster, the first three steps are not necessary.
Install the CloudWatch Agent on the cluster’s instances on instance creation
If the cluster’s instances are created through an Auto Scaling Group that we manage, then the ASG must have a Launch Configuration. This Launch Configuration allows us to execute an initialization script on our instances, which we will use to install the CloudWatch Agent. In order to do so, we need to create a new version of the Launch Configuration and add the following script in User Data:
This will install and execute the CloudWatch Logs agent in every instance when they are created, as well as start the agent.
Note: If you already have User Data set up, you can paste this first, leaving your existing User Data after the last --==BOUNDARY==--. That way, this script will execute first, and then your previous User Data will execute.
Restart all instances (ideally, one by one and not reducing capacity)
In order to do this, you can simply increase the desired capacity of the Auto Scaling Group by 1, wait until instance creation finishes, terminate each of the old instances (wait until a new instance is created before terminating the next one), then reduce the desired capacity to its previous value.
Note: If for some reason restarting instances is impractical (for example, you’re not using an Auto Scaling Group which would automatically recreate instances), you can execute the above script manually in every instance. To do that, separate it into 4 scripts by removing the first 2 lines and all instances of --==BOUNDARY==, Content-Type: text/x-shellscript; charset="us-ascii" and #!/usr/bin/env bash, add execution permissions to all 4 scripts and run them as root.
Add permissions to the EC2 instance role to publish log events
The EC2 instances are already running with an EC2 instance role. In this step, we will add a policy to this role, adding the necessary permissions to send logs to CloudWatch.
Note: It’s likely that all instances in most/all ECS clusters are running with the same instance role. If this is the case, adding a policy to that role will effectively add these permissions to all instances in most/all ECS clusters. This is probably what you wish to do, but in case it isn’t, you should be mindful of giving additional permissions to other instances, even if they still won’t be able to actually publish logs to CloudWatch without executing the other steps in this article.
1. In the AWS Console, go to the IAM service
2. Select Policies
3. Click Create Policy
4. Click Create Your Own Policy
5. In the JSON tab insert the following:
6. Click Review Policy
7. For Name enter ECS-CloudWatchLogs
8. For Description enter Role for Creating and Putting Logs to CloudWatch
9. Click Create Policy
Attach the Policy
1. In the AWS Console, go to the IAM service
2. Select Roles
3. Search for the role that your EC2 instances are using
4. Click Attach Policies
5. Search for ECS-CloudWatchLogsand select it
6. Click Attach Policy
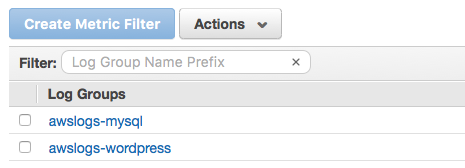
Create a log group for each Service
1. In the AWS Console, go to the CloudWatch service
2. Select Log groups
3. Click Actions → Create log group
4. Enter the name of the log group
5. Click Create log group
Update each Task Definition to send logs to the newly created log group
1. In the AWS Console, go to the ECS service
2. Select Task Definitions
3. Select the Task Definition that you want to update and click Create new revision
4. Scroll down to Container Definitions and click on the one you wish to configure logs for
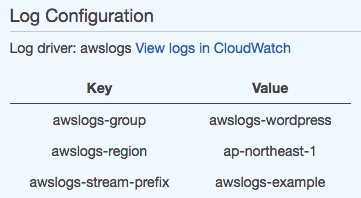
5. In the STORAGE AND LOGGING section, in Log configuration check Auto-configure CloudWatch Logs
6. In Log Options enter the following values:
a. For the key awslogs-group enter as value the name of the log group you created in the previous step
b. For the key awslogs-region enter as value the name of the region where you created the log group (if it’s the same region, then de default value will be that same region)
c. For the key awslogs-stream-prefix enter as value the prefix you wish to see for your logs. Remember that you can log different services to different log groups, so adding the same of the service as a prefix is not necessary to differentiate between the logs of different services. You might want to use this prefix to differentiate between different containers in the same service.
7. Click Update
Recreate all Tasks using the new Task Definition Revision
1. In the AWS Console, go to the ECS service
2. Select Clusters
3. Select the cluster which contains the service
4. Under the tab Services, select the service that you want to update
5. Click Update
6. Under Task Definition choose the new Revision that you created in the previous step
7. Check Force new deployment
8. Click Skip to review
9. Click Update Service
Note: Your service will be updated according to the Deployment type chosen at service creation. This can be Rolling update or Blue/green deployment (powered by AWS CodeDeploy). This and the values of Minimum healthy percent and Maximum percent will determine how your Tasks are recreated.
Viewing awslogs Container Logs in CloudWatch Logs
For tasks using the EC2 launch type, after your container instance role has the proper permissions to send logs to CloudWatch Logs, your container agents are updated to at least version 1.9.0, and you have configured and started a task with containers that use the awslogs log driver, your configured containers should be sending their log data to CloudWatch Logs. You can view and search these logs in the console.
To view your CloudWatch Logs data for a container from the Amazon ECS console
1. Open the Amazon ECS console at https://console.aws.amazon.com/ecs/.
2. On the Clusters page, select the cluster that contains the task to view.
3. On the Cluster: cluster_name page, choose Tasks and select the task to view.
4. On the Task: task_id page, expand the container view by choosing the arrow to the left of the container name.
5. In the Log Configuration section, choose View logs in CloudWatch, which opens the associated log stream in the CloudWatch console.
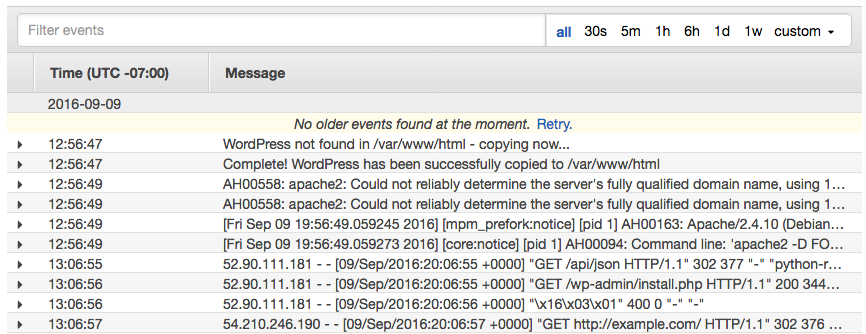
To view your CloudWatch Logs data in the CloudWatch console
1. Open the CloudWatch console at https://console.aws.amazon.com/cloudwatch/.
2. In the left navigation pane, choose Logs.
3. Select a log group to view. You should see the log groups that you created in Creating a Log Group.
4. Choose a log stream to view.
Want to know more about StackZone and how to make your cloud management simple and secure?
Check our how it works section with easy to follow videos or just create your own StackZone Account here.
